|
|
|
|
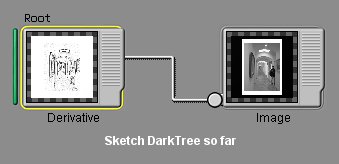
1. Sketching in an outline. First, were going to use the Process component, Derivative, to outline the areas of the image. Select a photo with good composition and not too many exceedingly busy areas. Architectural subjects with angles work very well, as do people and animals. There are many good choices. To begin, drag out a color Derivative component and a percent Image component. (See an image of the component placement below.) Next load your selected photo into the Image component. Now set Derivatives Color A parameter to white and Color B to black. Link the Mask parameter to the Image component.
Check the result so far in an expanded Examine Window. If you notice some unwanted noisiness, read the following section How to Clean Up Image Noisiness Since Derivative is quite good at its job, youll often find noise and defects that you didnt even realize were in the image. Jpeg files, for example, often show a grid of tiny boxes. This grid is actually an artifact of jpeg compression that is normally too subtle for the human eye to recognize. Even if youve selected an image that seems noise-free, you can still get unsatisfactory results. Take a look at the two sample images below. The jpeg on the left shows the noise artifacts from a jpeg compression; the image on the right has been cleaned up by DarkTree 2.0s Bitmap Renderer. |
 |
 |
||||||||||
|
So lets fix the problem!
What we have just done is get rid of the noise by oversampling or antialiasing the image. You can repeat this process several times for even smoother results. |
|||||||||||
|
2. Creating the Colored Brush Strokes Basically, were going to use a Birdshot component to create the brush strokes for our image-soon-to-be-great-art. Lets start by adding some more components to our existing DarkTree. First drag out a color Birdshot component. Set Birdshots Background parameter to white or the color of the paper youve selected for the final print. Set the Shot Size parameter to 70% and the Density to 100%. This will set the stroke size and the maximum number of strokes. Set Birdshots Sampling Options parameter to Single Sample. Single Sample ensures that each stroke is a single color. Next stretch and slant the shots by transforming them thus: Note: You can vary these transforms to make the brush strokes a different size, if you wish. The remaining chores are to drag out a color Image component, load your image and then link the Shots parameter to it. Lastly, link Derivatives Color A parameter to Birdshot. The following image shows the component arrangement so far. |
|||||||||||
 |
|||||||||||
|
3. Refining the Brush Strokes We can improve the brush strokes on our masterpiece with some more subtle variation using a Fade component. Heres how! First unlink the Shots parameter from the color Image component. Insert a color Fade component between them. Next, link the Shots parameter to Fade. And finally, link Fades Background parameter to the color Image component. Now add a bit of randomness so that each brush stroke will fade by a different amount. To add this effect, drag out a percent Randomizer component and link Fades Mask parameter to it. And lastly, set the fade range by setting Randomizers Percent Minimum to 11% and Percent Maximum to 60%. This will have more of an effect on saturated images. For unsaturated images, you could try Darken or Lighten in place of Fade. Think of additional tricks you can try to make the sketch more unique; there are many. The DarkTree below is the final one. And the last image is our final result. |
|||||||||||
 |
|||||||||||
 |
|||||||||||
|
Copyright © 2006 Darkling Simulations, LLC. All rights reserved. Any questions? Mail me! skyler@darksim.com |

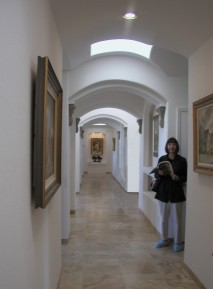 Creating a nice-quality colored sketch from a digital photo, such as the one shown here, is
relatively simple with DarkTree 2.0. The following steps will show you exactly how to do it.
Creating a nice-quality colored sketch from a digital photo, such as the one shown here, is
relatively simple with DarkTree 2.0. The following steps will show you exactly how to do it.
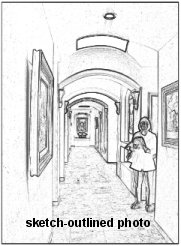 Derivative marks changes in the brightness of the image.
As a result, items in the photo will be outlined. Derivative includes a parameter called Sensitivity. You can use it to change the thickness of the outlines.
Derivative marks changes in the brightness of the image.
As a result, items in the photo will be outlined. Derivative includes a parameter called Sensitivity. You can use it to change the thickness of the outlines.
 Hint: If you are using
derivative to outline a smiling face, you might want to white out the gaps between the persons teeth with a paint program. Derivative is quite good at outlining the gaps between teeth, making the
person look like he has rotten teeth!
Hint: If you are using
derivative to outline a smiling face, you might want to white out the gaps between the persons teeth with a paint program. Derivative is quite good at outlining the gaps between teeth, making the
person look like he has rotten teeth!